WordPressでお問い合わせフォームを「Contact Form 7」などのプラグインを使わずに実装してみます。
シンプルに考えた場合、問い合わせたい人が入力すべきものは「名前」と「メールアドレス」と「内容」だけでいいはず。
たったこれだけを取得するだけですから、プラグインを使わずにjavascriptとPHPで実装してみました。
これで、全てのページに「Contact Form 7」のcssとjsファイルが読み込まれてしまうことを回避できます。また、「reCAPTCHA」の評価対象もお問い合わせフォームを実装したページのみになります。
結構簡単でしたので、備忘録として残します。
なお、当方はその道のプロではありませんのでご注意ください。
※記事内で紹介しているHTML・CSS・JavaScript・PHPなどのコードは、作成時点における作成者の最適解です。動作環境やバージョンによって結果が異なる場合があります。コードの使用により生じたいかなる損害やトラブルについても、当サイトは責任を負いかねます。
SMTPの設定
まずは、SMTPの設定を行います。
昨今、「なりすましメール」や「フィッシングメール」が問題化してきているため、メールを取り巻く環境が一段と厳しくなっています。特にGmailは厳しい・・・
問い合わせ者が送信ボタンを押すと、問い合わせ者と運営サイドにメールを自動送信しますので最低でもSMTPの設定はしておきます。
回答は別のメールソフトを使って送信する場合でも、そもそも運営サイドにお問い合わせがあったことを知らせるメールが来ないと意味ないですから。
SMTPは、メールをより確実に、より安全に届けてくれます。
さらに、SPF、DKIM、DMARCも設定しておくと完璧です。
詳しくは、別記事で。
お問い合わせフォームの実装
次のようにシンプルに実装します。
- 必須入力欄は「お名前」「メールアドレス」「お問い合わせ内容」のみ。
- お問い合わせ内容の確認ページは実装しない。
➡画面遷移させない。 - 送信ボタンを押すと演出で最低1秒間ローディング画面を表示させる。
- 完了ページも使わない。
➡画面遷移させずに送信に成功・エラーでメッセージをモーダル表示。
➡モーダルは、3秒間表示後自動で閉じる。×ボタンと背景クリックでも閉じられる。ただし、エラーモーダルは手動のまま。理由を読んでもらう必要があり、自動で閉じると見逃されるため。
➡送信成功後は、フォームをリセットし、入力したものは残らない。 - 自動返信メールを運営サイドと問い合わせ者に送る。
➡WordPress の wp_mail() を使ってメール送信。
➡第三者へスパム文面を送られるのを防ぐため、自動返信に、ユーザーが入力した記述文を載せない。 - セキュリティ対策
➡Googleの「reCAPTCHA v3」を導入してスコアまでサーバー側で検証する。
➡レート制限を「IP」「宛先メールアドレス」「サイト全体」の3段階でかける。
➡入力値のサニタイズ処理(WordPress関数)でHTMLタグなどの不正挿入を防ぐ
➡ハニーポット(ボットだけが埋める隠し欄)を置く。
➡文字数、URL、制御文字を制限する。
➡メールヘッダインジェクション対策でメールの乗っ取りや不正送信を防ぐ。
➡同一IPによる送信回数制限をかける。
➡同一メールアドレスへの1日あたりの送信回数制限をかける。
➡日本語のみとする。 - 必須項目に未入力がないかチェックをする。
➡未入力箇所があれば今のブラウザではこの時点で送信できないが、JSで補完的に入れておく
➡未入力箇所があればalert表示で警告 - 問い合わせ者のIPアドレスを取得する。
➡直接的には個人を特定できないが、個人情報に準ずる扱いとしプライバシーポリシーに取得と目的を表示させること
➡運営サイドへのメールにこの情報を入れる
完成形は次のとおり。(送信ボタンを押しても何もなりません)
reCAPTCHA v3の導入
reCAPTCHAを使用するために、「サイトキー」と「シークレットキー」を用意。
さらにGoogleCloudにまだ移行していなかったので、重い腰を上げて移行しました。
無料のまま使いたいので「課金システム」は無効状態です。
なので、無料分を超過するとその月はサービスが使えなくなりますが、私の小規模サイトであればまず超えることはないでしょう。
reCAPTCHAは10,000件の評価までは無料で使えますが、それを超えて使いたい場合は有料になります。
それを越えても無料のものを使いたい場合は他のCaptchaサービスを利用したほうがいいので、これ以降の内容を読んでも意味がありません。最初からreCAPTHAを導入しない方がいいです。
「hCaptcha」「Friendly Captcha」「Cloudflare Turnstile」などを探して導入してください。
まずはGoogleのreCAPTCHAのスクリプトタグを読み込む必要があるので、次のコードをカスタムHTMLブロックで入れます。
ただし、カスタムHTMLブロックで入れるのはWordPress非推奨ですので、マネしない方がいいです。推奨されているのは、wp_enqueue_scriptsフックを使用してfunctions.phpに書き込んで読み込ませる方法です。
<script src="https://www.google.com/recaptcha/api.js?render=あなたのサイトキー"></script>JavaScriptのメール送信コードでも「サイトキー」が必要になります。
なお、「シークレットキー」はPHPで使います。
吹き出し枠(ツールチップ)を表示してメッセージを伝える
入力欄にfocusしたときに吹き出し枠(ツールチップ)を表示させて、入力するうえで必要なメッセージをユーザーに伝えます。
placeholderにもメッセージを表示できますが、それ以外に伝えたい事柄があれば表示することができます。
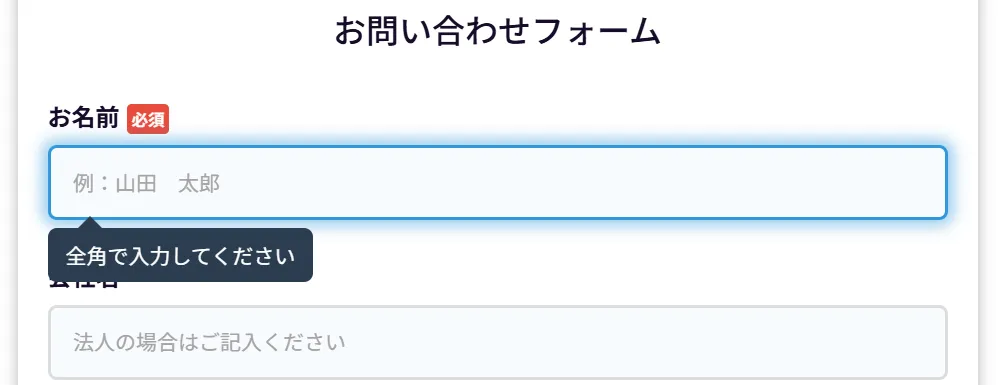
実装するには、HTMLに一行を加えて、cssでスタイル設定します。
<!-- HTML -->
<div class="form-group">
  <label for="name" class="required">お名前</label>
  <input type="text" id="name" class="namewaku" name="name" required placeholder="例:山田 太郎">
  <div class="tooltip">全角で入力してください</div> <!-- ←この一行を加えます -->
</div>
/* css */
.tooltip {
position: absolute;
top: 100%;
left: 0;
background-color: #2c3e50;
color: white;
padding: 8px 12px;
border-radius: 6px;
font-size: 14px;
white-space: nowrap;
z-index: 1000;
opacity: 0;
visibility: hidden;
transform: translateY(-10px);
transition: all 0.3s ease;
margin-top: 5px;
}
.tooltip::before {
content: '';
position: absolute;
top: -8px;
left: 20px;
border-left: 8px solid transparent;
border-right: 8px solid transparent;
border-bottom: 8px solid #2c3e50;
}
input:focus + .tooltip,
input.keypad-active + .tooltip {
opacity: 1;
visibility: visible;
transform: translateY(0);
}数字の入力はキーパッド方式を用いる
電話番号の入力はそれほど手間ではありませんが、生年月日や日付などの入力はそれなりに面倒だと思われるユーザーが多い(私もそのひとり)ので、次のようにキーパッドをモーダル表示させ、数字をタップして入力する方式を採用します。
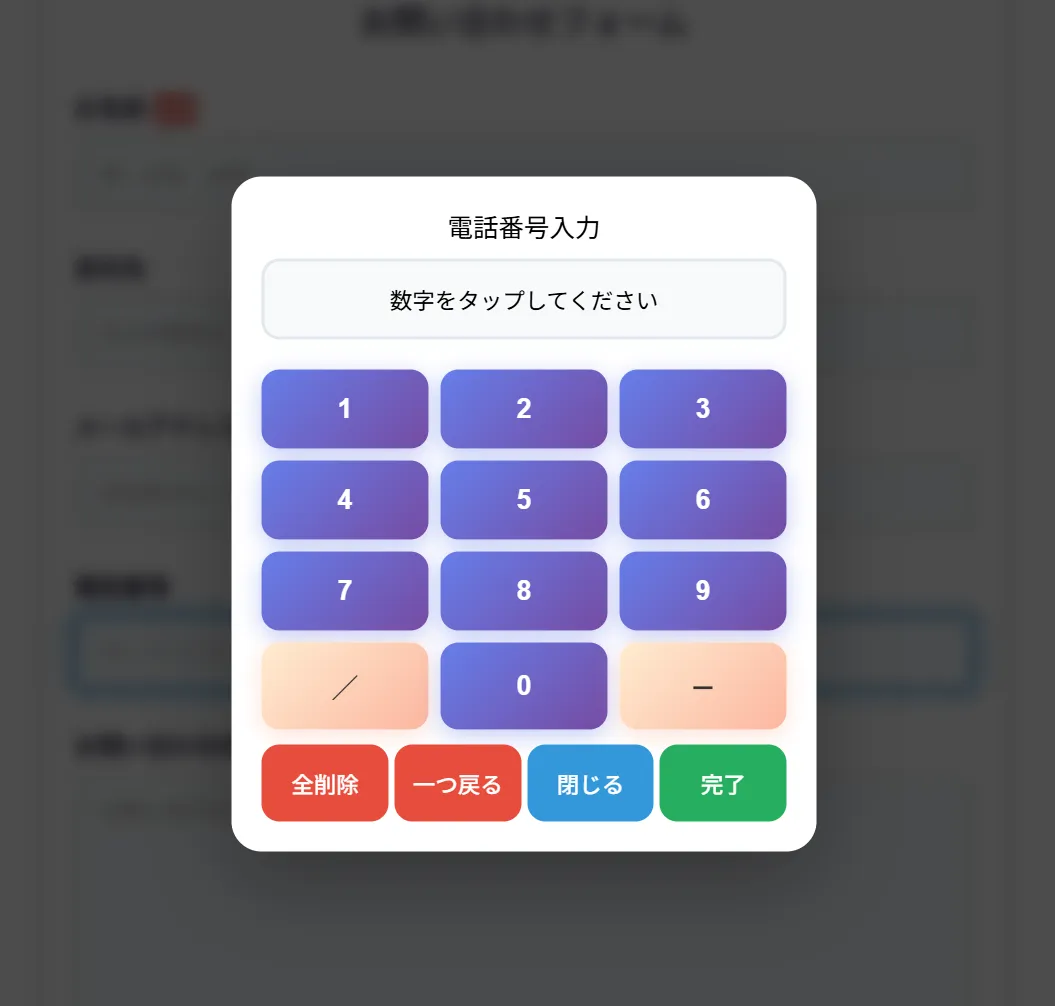
電話番号だとあまり効果はないかもしれませんが、他の数字入力でも代用できるので実装しておきます。
HTML+css+JavaScriptで実装します。
<!-- HTML -->
<div class="keypad-overlay" id="keypadOverlay">
  <div class="keypad-container">
    <div class="keypad-header">
      <div id="keypadTitle">数字入力</div>
    </div>
    <div class="keypad-display" id="keypadDisplay"></div>
    <div class="keypad-grid">
      <button type="button" class="keypad-btn" data-value="1">1</button>
      <button type="button" class="keypad-btn" data-value="2">2</button>
      <button type="button" class="keypad-btn" data-value="3">3</button>
      <button type="button" class="keypad-btn" data-value="4">4</button>
      <button type="button" class="keypad-btn" data-value="5">5</button>
      <button type="button" class="keypad-btn" data-value="6">6</button>
      <button type="button" class="keypad-btn" data-value="7">7</button>
      <button type="button" class="keypad-btn" data-value="8">8</button>
      <button type="button" class="keypad-btn" data-value="9">9</button>
      <button type="button" class="keypad-btn special" data-value="/">/</button>
      <button type="button" class="keypad-btn" data-value="0">0</button>
      <button type="button" class="keypad-btn special" data-value="-">-</button>
    </div>
    <div class="keypad-controls">
      <button type="button" class="clear-btn" id="keypadClear">全削除</button>
      <button type="button" class="back-btn" id="keypadBackspace">一つ戻る</button>
      <button type="button" class="cancel-btn" id="keypadCancel">閉じる</button>
      <button type="button" class="complete-btn" id="keypadComplete">完了</button>
    </div>
  </div>
</div>
<!-- ここまでHTML -->

/* css */
.keypad-trigger {
  cursor: pointer;
  user-select: none;
}
.keypad-overlay {
  position: fixed;
  top: 0;
  left: 0;
  width: 100%;
  height: 100%;
  background: rgba(0, 0, 0, 0.7);
  z-index: 1000;
  display: none;
  backdrop-filter: blur(5px);
}
.keypad-container {
  position: absolute;
  top: 50%;
  left: 50%;
  transform: translate(-50%, -50%);
  background: white;
  border-radius: 20px;
  padding: 20px;
  box-shadow: 0 20px 60px rgba(0,0,0,0.3);
  width: 95%;
  max-width: 350px;
}
.keypad-header {
  text-align: center;
  margin-bottom: 10px;
  font-size: 17px;
}
.keypad-display {
  background: #f8f9fa;
  border: 2px solid #e1e8ed;
  border-radius: 12px;
  padding: 10px;
  font-size: 15px;
  text-align: center;
  margin-bottom: 20px;
  min-height: 30px;
  display: flex;
  align-items: center;
  justify-content: center;
}
.keypad-grid {
  display: grid;
  grid-template-columns: repeat(3, 1fr);
  gap: 8px;
  margin-bottom: 10px;
}
.keypad-btn {
  background: linear-gradient(135deg, #667eea 0%, #764ba2 100%);
  color: white;
  border: none;
  border-radius: 12px;
  padding: 16px;
  font-size: 18px;
  font-weight: 600;
  cursor: pointer;
  transition: all 0.3s ease;
  box-shadow: 0 4px 15px rgba(102, 126, 234, 0.4);
}
.keypad-btn:hover {
  transform: translateY(-2px);
  box-shadow: 0 6px 20px rgba(102, 126, 234, 0.6);
}
.keypad-btn:active {
  transform: translateY(0);
}
.keypad-btn.special {
  background: linear-gradient(135deg, #ffecd2 0%, #fcb69f 100%);
  color: #333;
  box-shadow: 0 4px 15px rgba(252, 182, 159, 0.4);
}
.keypad-controls {
  display: flex;
  gap: 4px;
}
.keypad-controls button {
  flex: 1;
  padding: 15px 5px;
  border: none;
  border-radius: 12px;
  font-size: 15px;
  font-weight: 500;
  cursor: pointer;
  transition: all 0.3s ease;
}
.clear-btn {
  background: #e74c3c;
  color: white;
}
.back-btn {
  background: #e74c3c;
  color: white;
}
.cancel-btn {
  background: #3498db;
  color: white;
}
.complete-btn {
  background: #27ae60;
  color: white;
}
.complete-btn:hover,
.cancel-btn:hover,
.back-btn:hover,
.clear-btn:hover {
  transform: translateY(-2px);
  box-shadow: 0 6px 20px rgba(0,0,0,0.2);
}
/* ここまでcss */

// JavaScript
// ===== キーパッド =====
const overlay = document.getElementById('keypadOverlay');
const display = document.getElementById('keypadDisplay');
const titleEl = document.getElementById('keypadTitle');
const PLACEHOLDER = '数字をタップしてください';
const TITLES = { phone: '電話番号入力' };
const DEFAULT_MAX_LEN = 20;

let currentInput = null;
let inputValue = '';

if (overlay && display && titleEl) {
  function renderDisplay() {
    display.textContent = inputValue || PLACEHOLDER;
  }

  function openKeypad(input) {
    if (currentInput === input) return; // focus と click の二重発火対策
    currentInput = input;
    inputValue = input.value || '';
    titleEl.textContent = TITLES[input.id] || '数字入力';
    renderDisplay();
    overlay.style.display = 'block';
    document.body.style.overflow = 'hidden';
  }

  function closeKeypad() {
    overlay.style.display = 'none';
    document.body.style.overflow = '';
    if (currentInput) currentInput.blur(); // 再タップで開き直せるようにする
    currentInput = null;
    inputValue = '';
  }

  document.querySelectorAll('.keypad-trigger').forEach(function (input) {
    input.addEventListener('focus', function () { openKeypad(this); });
    input.addEventListener('click', function () { openKeypad(this); });
  });

  document.querySelectorAll('.keypad-btn[data-value]').forEach(function (btn) {
    btn.addEventListener('click', function () {
      if (!currentInput) return;
      const max = currentInput.maxLength > 0 ? currentInput.maxLength : DEFAULT_MAX_LEN;
      if (inputValue.length >= max) return;
      inputValue += this.dataset.value;
      renderDisplay();
    });
  });

  document.getElementById('keypadBackspace').addEventListener('click', function () {
    inputValue = inputValue.slice(0, -1);
    renderDisplay();
  });

  document.getElementById('keypadClear').addEventListener('click', function () {
    inputValue = '';
    renderDisplay();
  });

  document.getElementById('keypadComplete').addEventListener('click', function () {
    if (currentInput) currentInput.value = inputValue;
    closeKeypad();
  });

  document.getElementById('keypadCancel').addEventListener('click', closeKeypad);

  overlay.addEventListener('click', function (e) {
    if (e.target === overlay) closeKeypad();
  });
}
ローディング画面の設定
送信ボタンを押した後に最低1秒間表示させるローディング画面を設定します。
なお、ローディングは色々紹介されていますので、自分好みのものを探してみてください。
HTML+css+JavaScriptで実装しますが、JavaScriptのコードは後述の「送信ボタンを押した後の挙動」で。
<!-- HTML -->
<div id="loading-wrapper">
  <div id="loading-text">送信中</div>
  <div id="loading-content"></div>
</div>

/* css */
#loading-wrapper {
  background: rgb(0 0 0 / .6);
  position: fixed;
  width: 100%;
  height: 100%;
  left: 0;
  top: 0;
  z-index: 999;
  display: none;
}
#loading-text {
  display: block;
  position: absolute;
  top: 50%;
  left: 50%;
  color: white;
  width: 100px;
  height: 30px;
  margin: -7px 0 0 -45px;
  text-align: center;
  font-family: 'PT Sans Narrow', sans-serif;
  font-size: 16px;
}
#loading-content {
  display: block;
  position: relative;
  left: 50%;
  top: 50%;
  width: 130px;
  height: 130px;
  margin: -65px 0 0 -65px;
  border: 3px solid #F00;
}
#loading-content:after {
  content: "";
  position: absolute;
  border: 3px solid #0F0;
  left: 15px;
  right: 15px;
  top: 15px;
  bottom: 15px;
}
#loading-content:before {
  content: "";
  position: absolute;
  border: 3px solid #00F;
  left: 5px;
  right: 5px;
  top: 5px;
  bottom: 5px;
}
#loading-content {
  border: 3px solid transparent;
  border-top-color: #4D658D;
  border-bottom-color: #4D658D;
  border-radius: 50%;
  -webkit-animation: loader 2s linear infinite;
  -moz-animation: loader 2s linear infinite;
  -o-animation: loader 2s linear infinite;
  animation: loader 2s linear infinite;
}
#loading-content:before {
  border: 3px solid transparent;
  border-top-color: #D4CC6A;
  border-bottom-color: #D4CC6A;
  border-radius: 50%;
  -webkit-animation: loader 3s linear infinite;
    -moz-animation: loader 2s linear infinite;
  -o-animation: loader 2s linear infinite;
  animation: loader 3s linear infinite;
}
#loading-content:after {
  border: 3px solid transparent;
  border-top-color: #84417C;
  border-bottom-color: #84417C;
  border-radius: 50%;
  -webkit-animation: loader 1.5s linear infinite;
  animation: loader 1.5s linear infinite;
    -moz-animation: loader 2s linear infinite;
  -o-animation: loader 2s linear infinite;
}
@-webkit-keyframes loaders {
  0% {
    -webkit-transform: rotate(0deg);
    -ms-transform: rotate(0deg);
    transform: rotate(0deg);
  }
  100% {
    -webkit-transform: rotate(360deg);
    -ms-transform: rotate(360deg);
    transform: rotate(360deg);
  }
}
@keyframes loader {
  0% {
    -webkit-transform: rotate(0deg);
    -ms-transform: rotate(0deg);
    transform: rotate(0deg);
  }
  100% {
    -webkit-transform: rotate(360deg);
    -ms-transform: rotate(360deg);
    transform: rotate(360deg);
  }
}
モーダルウィンドウの設定
送信ボタンを押した後に1秒間ローディング画面を表示させて、送信に成功・エラーで表示させるモーダルウィンドウを設定します。
HTML+css+JavaScriptで実装しますが、JavaScriptのコードはこちらも後述の「送信ボタンを押した後の挙動」で。
<!-- HTML -->
<div class="contact-success modal-overlay">
<div class="modal-inner">
<span class="close">×</span>
<div class="comment1">受け付けました!</div>
<div class="comment2">お返事までしばらくお待ちください。</div>
</div>
</div>
<div class="contact-error modal-overlay">
<div class="modal-inner">
<span class="close">×</span>
<div class="comment1">送信に失敗しました!</div>
<div class="comment2">時間をおいて再度お試しください。</div>
</div>
</div>
/* css */
.modal-overlay {
display: none;
position: fixed;
top: 0;
left: 0;
width: 100%;
height: 100%;
background: rgb(0 0 0 / .5);
justify-content: center;
align-items: center;
z-index: 99;
overflow: hidden;
}
.modal-inner {
position: relative;
display: flex;
flex-direction: column;
justify-content: center;
align-items: center;
text-align: center;
width: 90%;
max-width: 400px;
height: 50%;
background: white;
padding: 10px 0;
border: 3px solid #997526;
border-radius: 20px;
}
.close {
position: absolute;
display: flex;
align-items: center;
justify-content: center;
top: 5px;
right: 5px;
height: 30px;
width: 30px;
font-size: 18px;
font-weight: 600;
background: #ffec47;
border: 1px solid #006e54;
border-radius: 50%;
color: #00a381;
cursor: pointer;
z-index: 999;
}
.comment1 {
font-size: 23px;
font-weight: 600;
color: #264B99;
font-family: "Noto Sans JP", sans-serif;
margin: 10px 0;
}
.comment2 {
font-size: 16px;
font-weight: 400;
color: #160c28;
font-family: "Noto Sans JP", sans-serif;
margin-top: 10px;
}入力フォームの設定
その道のプロではないので、適当に作っています。
HTML
表示させたい場所に、カスタムHTMLブロックで入れます。前述の吹き出し枠も含めたコードになります。
実際の運用には、前述で紹介したキーパッド・ローディング・モーダルのHTMLコードも加える必要があります。
なお、フォームに、人間には見えない入力欄を1つ置きます(ハニーポッド)。ボットだけが引っかかるようにした罠です。人間には見えないので、そこは空のまま送信されますが、ボットはHTMLを機械的に読み、見つけた入力欄を全部埋めようとするので、ポット欄に何かを入れて送ってきます。サーバー側で、hp_noteに値が入っていたらボットと判断し、メールを送らずに終了するという罠です。
<div class="form-container">
  <div class="title">お問い合わせフォーム</div>
  <form id="userForm" class="mailform">
    <div class="form-group">
      <label for="name" class="required">お名前</label>
      <input type="text" id="name" class="namewaku" name="name" maxlength="50" autocomplete="name" required placeholder="例:山田 太郎">
      <div class="tooltip">全角で入力してください</div>
    </div>

    <div class="form-group">
      <label for="company">会社名</label>
      <input type="text" id="company" class="companywaku" name="company" maxlength="100" autocomplete="organization" placeholder="法人の場合はご記入ください">
      <div class="tooltip">例:㈱YAMADA</div>
    </div>

    <div class="form-group">
      <label for="email" class="required">メールアドレス</label>
      <input type="email" id="email" class="emailwaku" name="email" maxlength="254" autocomplete="email" required placeholder="返信先のメールアドレスをご記入ください">
      <div class="tooltip">例:example@email.com</div>
    </div>

    <div class="form-group">
      <label for="phone">電話番号</label>
      <input type="text" id="phone" name="phone" class="keypad-trigger" maxlength="20" readonly placeholder="タップして入力してください">
    </div>

    <div class="form-group">
      <label for="message" class="required">お問い合わせ内容</label>
      <textarea id="message" name="message" maxlength="2000" required placeholder="お問い合わせ内容をご記入ください"></textarea>
    </div>

    <!-- ハニーポット:人間には見えない。ボットだけが入力する -->
    <div class="hp-field" aria-hidden="true">
      <label>メモ<input type="text" name="hp_note" tabindex="-1" autocomplete="off"></label>
    </div>

    <div class="form-group">
      <label for="check" class="check">
        <input id="check" type="checkbox" name="check" required>入力内容を確認しました
      </label>
    </div>

    <button type="submit" id="submit" class="submit-btn">送信</button>
  </form>
</div>
css
これまた、その道のプロではないので適当に作っています。
子テーマのstyle.cssに追加するとか、wp_enqueue_scriptsフックを使用して処理するのがベストなのでしょう。
吹き出し枠のcssは含んでいませんが、実際の運用には前述のcssも加える必要があります。まあ、自分好みに変更してください。なお、ハニーポットのcss(hp-field)は忘れないでください。画面の外(左に9999px)に追い出し、人間の目にも、Tabキーの移動にも、スクリーンリーダーにも出ないようにしています。
.hp-field {
  position: absolute;
  left: -9999px;
  width: 1px;
  height: 1px;
  overflow: hidden;
}
.form-container {
  width: 98%;
  max-width: 600px;
  margin: 0 auto;
  background: white;
  padding: 20px;
  border-radius: 10px;
  box-shadow: 0 2px 10px rgba(0,0,0,0.3);
  font-family: 'Noto Sans JP', 'Segoe UI', Tahoma, Geneva, Verdana, sans-serif;
}
.title {
  font-size: 22px;
  font-weight: 500;
  text-align: center;
  color: #160c28;
  margin-bottom: 30px;
}
.form-group {
  position: relative;
  margin-bottom: 25px;
}
label {
  display: block;
  margin-bottom: 8px;
  font-weight: 600;
  color: #160c28;
}
.required {
  color: #160c28;
}
.required::after {
  content: "必須";
  color: white;
  font-size: 11px;
  background: #e74c3c;
  padding: 2px 3px;
  margin-left: 5px;
  border-radius: 3px;
}
input[type="text"],
input[type="email"],
input[type="tel"],
textarea {
  width: 100%;
  max-width: 100%;
  height: 50px;
  padding: 12px 15px;
  border: 2px solid #ddd;
  border-radius: 6px;
  font-size: 16px;
  transition: border-color 0.3s ease;
  box-sizing: border-box;
  background: #f7fcfe;
}
textarea {
  resize: vertical;
  min-height: 200px;
}
input[type="text"]:focus,
input[type="email"]:focus,
input[type="tel"]:focus,
textarea:focus {
  outline: none;
  border-color: #3498db;
  box-shadow: 0 0 10px 4px rgb(52 152 219 / .5)
}
送信ボタンを押した後の挙動(JavaScript)
以下のコードで実装しました。recaptchaのサイトキー、PHPファイルのアクセスURLは隠しています。
なお、サイトキーは公開されても問題ないので、フロントエンド側(HTML・javascript)に置いています。
最低1秒間のローディング画面を表示させて、モーダルを表示。成功したら3秒間モーダルを表示後自動で閉じます。×ボタンと背景クリックでも閉じられます。
ただし、エラーモーダルは手動のままです。理由を読んでもらう必要があり、自動で閉じると見逃されるためです。
該当ページだけなので、面倒くさくて<script>タグで囲んでカスタムHTMLブロックでページの最後に入れました(WordPress非推奨)。【前述のキーパッドコードは含んでいません。】
(function () {
  // ===== 設定 =====
  const SITE_KEY = '××××××';        // reCAPTCHA のサイトキー(元のコードの値)
  const ENDPOINT = '××××××';        // PHPのURL(元のコードの値)
  const MIN_LOADING_MS = 1000;      // ローディング最低表示時間
  const AUTO_CLOSE_MS = 3000;       // 成功モーダルの自動クローズ
  const REQUIRE_JAPANESE = true;    // PHP側の REQUIRE_JAPANESE と合わせる

  // ===== 送信処理 =====
  const form = document.getElementById('userForm');
  if (!form) return;

  const submitBtn = document.getElementById('submit');
  const loadingWrapper = document.getElementById('loading-wrapper');
  const popupSuccess = document.querySelector('.contact-success');
  const popupError = document.querySelector('.contact-error');
  const errorDetail = popupError.querySelector('.comment2');
  const DEFAULT_ERROR_TEXT = errorDetail.textContent;

  let isSending = false;
  let autoCloseTimer = null;

  function sleep(ms) {
    return new Promise(function (resolve) { setTimeout(resolve, ms); });
  }

  function containsJapanese(text) {
    return /[\u3040-\u309F\u30A0-\u30FF\u4E00-\u9FAF]/.test(text);
  }

  function getRecaptchaToken() {
    return new Promise(function (resolve, reject) {
      if (typeof grecaptcha === 'undefined') {
        reject(new Error('reCAPTCHA not loaded'));
        return;
      }
      grecaptcha.ready(function () {
        grecaptcha.execute(SITE_KEY, { action: 'submit' }).then(resolve).catch(reject);
      });
    });
  }

  function hidePopups() {
    clearTimeout(autoCloseTimer);
    popupSuccess.style.display = 'none';
    popupError.style.display = 'none';
  }

  function showSuccess() {
    hidePopups();
    popupSuccess.style.display = 'flex';
    autoCloseTimer = setTimeout(hidePopups, AUTO_CLOSE_MS);
  }

  // エラーは読んでもらう必要があるので自動では閉じない
  function showError(text) {
    hidePopups();
    errorDetail.textContent = text || DEFAULT_ERROR_TEXT;
    popupError.style.display = 'flex';
  }

  form.addEventListener('submit', async function (event) {
    event.preventDefault();
    if (isSending) return;

    const formData = new FormData(form);
    const name = (formData.get('name') || '').trim();
    const message = (formData.get('message') || '').trim();

    if (!name || !message) {
      alert('必須項目を入力してください。');
      return;
    }
    if (REQUIRE_JAPANESE && (!containsJapanese(name) || !containsJapanese(message))) {
      alert('お名前とお問い合わせ内容は日本語で入力してください。');
      return;
    }

    isSending = true;
    submitBtn.disabled = true;
    loadingWrapper.style.display = 'flex';
    const startedAt = Date.now();

    let result = null;
    try {
      const token = await getRecaptchaToken();
      formData.set('recaptcha', token);

      const response = await fetch(ENDPOINT, { method: 'POST', body: formData });
      const text = await response.text();

      let data = null;
      try {
        data = JSON.parse(text);
      } catch (parseError) {
        console.error('[form] JSONではない応答 (status ' + response.status + '):', text.slice(0, 500));
        throw parseError;
      }

      result = { ok: data.status === 'success', message: data.message || '' };
    } catch (error) {
      console.error('[form] 送信エラー:', error);
      result = { ok: false, message: '通信エラーが発生しました。' };
    }

    // ローディングは最低 MIN_LOADING_MS 表示
    const elapsed = Date.now() - startedAt;
    if (elapsed < MIN_LOADING_MS) await sleep(MIN_LOADING_MS - elapsed);

    loadingWrapper.style.display = 'none';
    isSending = false;
    submitBtn.disabled = false;

    if (result.ok) {
      form.reset();
      showSuccess();
    } else {
      showError(result.message);
    }
  });

  // ===== モーダルを閉じる =====
  document.querySelectorAll('.contact-success .close, .contact-error .close').forEach(function (el) {
    el.addEventListener('click', hidePopups);
  });
  [popupSuccess, popupError].forEach(function (popup) {
    popup.addEventListener('click', function (e) {
      if (e.target === popup) hidePopups();
    });
  });
})();
PHPファイル
メールを送るためのPHPファイルを作成します。コードは下記のとおり。
×××の部分は、ご自身のに置き換えてください。
reCAPTCHA のシークレットキーは、ファイル流出時のリスク軽減のためwp-config.phpに追記します。冒頭でwp-load.phpを読み込んでいるので、wp-config.phpも読み込みます。wp-config.phpで定義した定数をそのまま使えるということです。
なお、追記の箇所は、require_once ABSPATH . 'wp-settings.php';より前に追記する必要があります。
追記するコードは、
define('CONTACT_RECAPTCHA_SECRET_KEY', 'ここに実際のシークレットキー');問い合わせ者のIPアドレスを取得して運営サイドへ知らせるようにしています。取得しなくても問題ありませんが、スパムや悪質な問い合わせへの対応のために一応取得しておきます。
なお、取得する情報については、プライバシーポリシーに取得と目的の明示が必須となります。
<?php
require_once $_SERVER['DOCUMENT_ROOT'] . '/wp-load.php';

header('Access-Control-Allow-Origin: https://××××××.com');
header('Access-Control-Allow-Headers: Content-Type');
header('Content-Type: application/json; charset=UTF-8');
date_default_timezone_set('Asia/Tokyo');

if (($_SERVER['REQUEST_METHOD'] ?? '') !== 'POST') {
    http_response_code(405);
    exit;
}

/* ===== 設定 ===== */
define('FORM_ID', 'contact');          // フォームごとに変える(レート制限のキー用)
define('RECAPTCHA_ACTION', 'submit');
define('RECAPTCHA_MIN_SCORE', 0.5);    // 0.0(ボット)〜1.0(人間)
$allowed_hostnames = ['××××××.com', 'www.××××××.com'];

define('COOLDOWN_SECONDS', 30);        // 同一IPの連続送信間隔
define('LIMIT_IP_PER_HOUR', 5);        // 同一IPの1時間あたりの送信試行回数
define('LIMIT_EMAIL_PER_DAY', 3);      // 同一メールアドレスへの1日あたりの送信回数
define('LIMIT_GLOBAL_PER_DAY', 100);   // このフォーム全体の1日あたりの送信回数

define('MAX_NAME_LEN', 50);
define('MAX_COMPANY_LEN', 100);
define('MAX_MESSAGE_LEN', 2000);
define('REQUIRE_JAPANESE', true);      // お名前・お問い合わせ内容に日本語を必須にするか

$admin_email = '××××××@××××××.com';
$from_email  = '××××××@××××××.com';

/* ===== 共通関数 ===== */
function respond($status, $message = '') {
    $res = ['status' => $status];
    if ($message !== '') $res['message'] = $message;
    echo json_encode($res, JSON_UNESCAPED_UNICODE);
    exit;
}

function getUserIP() {
    $ip = $_SERVER['REMOTE_ADDR'] ?? '';
    return filter_var($ip, FILTER_VALIDATE_IP) ? $ip : '';
}

function post_str($key) {
    return (isset($_POST[$key]) && is_string($_POST[$key])) ? $_POST[$key] : '';
}

function clean_input($data) {
    $s = preg_replace('/[\x00-\x1F\x7F]+/u', '', (string)$data);
    return trim($s === null ? '' : $s);
}

function containsJapanese($text) {
    return preg_match('/[\x{3040}-\x{309F}\x{30A0}-\x{30FF}\x{4E00}-\x{9FAF}]/u', $text) === 1;
}

// URLらしき文字列を含むか(お名前用。ドメイン形式も検出)
function containsUrl($text) {
    return preg_match('~(https?:|ftp:|www\.|[a-z0-9-]+\.(com|net|org|info|biz|xyz|top|ru|cn|click|site|online|shop)\b)~i', $text) === 1;
}

// URLの個数(https:// や www. の形式)
function countUrls($text) {
    return (int) preg_match_all('~https?://|www\.~i', $text);
}

// 上限に達していれば true。達していなければカウントを増やして false
function rate_limit_hit($key, $limit, $ttl) {
    $count = (int) get_transient($key);
    if ($count >= $limit) return true;
    set_transient($key, $count + 1, $ttl);
    return false;
}

/* ===== 1. ハニーポット(ボットだけが入力する隠し欄) ===== */
if (post_str('hp_note') !== '') {
    respond('success');
}

/* ===== 2. 入力取得・検証 ===== */
$ip_address = getUserIP();
if ($ip_address === '') respond('error', '送信に失敗しました。時間をおいて再度お試しください。');

$name    = sanitize_text_field(clean_input(post_str('name')));
$company = sanitize_text_field(clean_input(post_str('company')));
$email   = sanitize_email(clean_input(post_str('email')));
// 電話番号:全角を半角にそろえる(-→-、/→/ を含む)
$phone   = mb_convert_kana(sanitize_text_field(clean_input(post_str('phone'))), 'as', 'UTF-8');
$message = sanitize_textarea_field(post_str('message'));
$recaptcha_response = post_str('recaptcha');

if ($name === '' || $email === '' || $message === '') {
    respond('error', '必須項目を入力してください。');
}
if (strlen($email) > 254 || !is_email($email)) {
    respond('error', 'メールアドレスの形式が正しくありません。');
}
if (mb_strlen($name, 'UTF-8') > MAX_NAME_LEN
    || mb_strlen($company, 'UTF-8') > MAX_COMPANY_LEN
    || mb_strlen($message, 'UTF-8') > MAX_MESSAGE_LEN) {
    respond('error', '入力内容が長すぎます。');
}
if (REQUIRE_JAPANESE && (!containsJapanese($name) || !containsJapanese($message))) {
    respond('error', 'お名前とお問い合わせ内容は日本語で入力してください。');
}
if (containsUrl($name)) {
    respond('error', 'お名前にURLは使用できません。');
}
if (countUrls($company) > 0) {
    respond('error', '会社名にURLは使用できません。');
}
if (countUrls($message) > 2) {
    respond('error', 'お問い合わせ内容にURLを複数含めることはできません。');
}

// 電話番号(任意):数字・ハイフン・スラッシュのみ、数字が6桁以上
if ($phone !== '') {
    $digit_count = preg_match_all('/[0-9]/', $phone);
    if (!preg_match('/^[0-9\/\-]{6,20}$/', $phone) || $digit_count < 6) {
        respond('error', '電話番号の形式が正しくありません。');
    }
}

$company_display = ($company !== '') ? $company : '未記入';
$phone_display   = ($phone !== '') ? $phone : '未記入';

/* ===== 3. レート制限(IP) ===== */
$ip_hash = md5($ip_address);
if (get_transient('contact_' . FORM_ID . '_cool_' . $ip_hash)) {
    respond('error', '短時間に複数の送信はできません。');
}
if (rate_limit_hit('contact_' . FORM_ID . '_ip_' . $ip_hash, LIMIT_IP_PER_HOUR, HOUR_IN_SECONDS)) {
    respond('error', '送信回数の上限に達しました。時間をおいて再度お試しください。');
}
set_transient('contact_' . FORM_ID . '_cool_' . $ip_hash, 1, COOLDOWN_SECONDS);

/* ===== 4. reCAPTCHA v3 検証(success + action + hostname + score) ===== */
if ($recaptcha_response === '') {
    respond('error', 'スパム判定されました。');
}

if (!defined('CONTACT_RECAPTCHA_SECRET_KEY')) {
    error_log('[' . FORM_ID . '] CONTACT_RECAPTCHA_SECRET_KEY is not defined');
    respond('error', '送信に失敗しました。時間をおいて再度お試しください。');
}

$res = wp_remote_post('https://www.google.com/recaptcha/api/siteverify', [
    'timeout' => 5,
    'body' => [
        'secret'   => CONTACT_RECAPTCHA_SECRET_KEY,
        'response' => $recaptcha_response,
        'remoteip' => $ip_address,
    ],
]);
if (is_wp_error($res)) {
    error_log('[' . FORM_ID . '] recaptcha request failed: ' . $res->get_error_message());
    respond('error', '送信に失敗しました。時間をおいて再度お試しください。');
}
$r = json_decode(wp_remote_retrieve_body($res), true);
$recaptcha_ok = is_array($r)
    && !empty($r['success'])
    && ($r['action'] ?? '') === RECAPTCHA_ACTION
    && in_array($r['hostname'] ?? '', $allowed_hostnames, true)
    && (float)($r['score'] ?? 0) >= RECAPTCHA_MIN_SCORE;

if (!$recaptcha_ok) {
    error_log('[' . FORM_ID . '] recaptcha rejected. score=' . ($r['score'] ?? 'n/a') . ' ip=' . $ip_address);
    respond('error', 'スパム判定されました。');
}

/* ===== 5. レート制限(フォーム全体・宛先メールアドレス) ===== */
if (rate_limit_hit('contact_' . FORM_ID . '_all_' . date('Ymd'), LIMIT_GLOBAL_PER_DAY, DAY_IN_SECONDS)) {
    respond('error', '本日の受付上限に達しました。明日以降に再度お試しください。');
}
if (rate_limit_hit('contact_' . FORM_ID . '_mail_' . md5(strtolower($email)), LIMIT_EMAIL_PER_DAY, DAY_IN_SECONDS)) {
    respond('error', 'このメールアドレスからの送信回数の上限に達しました。');
}

/* ===== 6. 運営者へ通知 ===== */
$admin_subject = 'お問い合わせがありました';
$admin_message = implode("\n", [
    "{$name} 様より以下の内容でお問い合わせがありました。",
    '',
    "名前: {$name}",
    "会社名: {$company_display}",
    "メール: {$email}",
    "電話番号: {$phone_display}",
    "IPアドレス: {$ip_address}",
    '',
    'お問い合わせ内容:',
    $message,
]);
$admin_headers = [
    "From: ㈱×××× <{$from_email}>",
    "Reply-To: {$email}",
    'Content-Type: text/plain; charset=UTF-8',
];

if (!wp_mail($admin_email, $admin_subject, $admin_message, $admin_headers)) {
    error_log('[' . FORM_ID . '] admin mail failed');
    respond('error', 'メール送信に失敗しました。時間をおいて再度お試しください。');
}

/* ===== 7. 自動返信(お問い合わせ内容の自由記述は載せない) ===== */
$user_subject = 'お問い合わせを受け付けました';
$user_message = implode("\n", [
    '※このメールはシステムからの自動返信です',
    '',
    "{$name} 様",
    '',
    'この度は、㈱××××へお問い合わせいただきありがとうございます。',
    'お問い合わせの件につきましては、近日中にお返事いたしますので今しばらくお待ちください。',
    '',
    '※いただいた内容は、担当者が確認いたします。',
    '※このメールに心当たりがない場合は、お手数ですが破棄してください。',
    '',
    '--------------------------------',
    '㈱××××',
    'TEL:××××',
]);
$user_headers = [
    "From: ㈱×××× <{$from_email}>",
    'Content-Type: text/plain; charset=UTF-8',
];

if (!wp_mail($email, $user_subject, $user_message, $user_headers)) {
    error_log('[' . FORM_ID . '] auto-reply failed');
}

respond('success');